Instructions for setting up the Old Bird 21c microphone (v2020, v2024 & v2025)
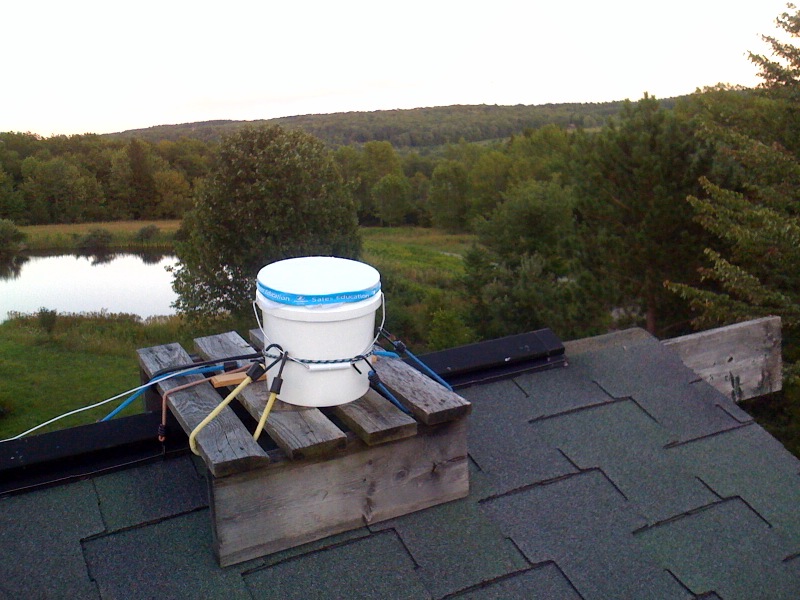
Opening shipping box: There are four items inside the box - the Old Bird 21c microphone (the white bucket), white cable with a black connection box on one end (for v2025, this cable is hardwired to the mic), AC-DC power supply, and a black miniplug audio cable for connecting the signal from the black box to a computer, audio recorder, or speaker.
Take care when handling the microphone so that the cloth cover and its seal are not damaged. Although it is fairly robust, don't push down on the cover or set objects on it. Also, take care when handling the audio cable. To reduce the cost of the system, four-conductor phone wire is used for audio cable - it works well but is more susceptible to damage after repeated bending. When uncoiling the cable, use a dowel through the hole in the wire coil to unspool the wire. If you are not setting up a permanent monitoring station and are continually uncoiling and recoiling the cable, buy a hand-wind cable reel so that the cable does not get tangled -- these can typically be found in the electric section of most hardware stores.
Operation of equipment: The black box has two open holes, one is for the power supply (in most cases the larger hole) and the other is for the included black miniplug audio cable. The other end of the miniplug audio cable goes to the microphone input of your computer or audio recording device.
Once your mic is secured in location, you can connect the audio cable. If you need to run the cable through a hole in a building to connect to your computer or audio system, using a smallish Phillips head screwdriver you can unscrew and open the lid of the black box, unscrew the circuit board from the bottom of the box, feed some of the white audio cable into the box as you gently pull the circuit board from the box. Then, on a flat nonconductive surface, depress the four buttons on the green connector interface for the four wires from the audio cable and disconnect the white audio cable from the circuit board/box. Now you can feed the audio cable from the mic into a small opening into a building and reconnect it to the circuit board on the inside of the building. Also, if one desires a shorter audio cable, the white audio cable can be cut to the desired length, then carefully strip about an inch of insulation off the end of the white cable (making sure not to cut any of the four wires inside). Then strip a quarter inch of insultation off each of the four wires inside. Feed these wires and the white audio cable through the hole on the short side of the black box - about 12 inches or so, and then reconnect the colored wires to the green junction box on the circuit board - do so with the circuit board on a flat nonconductive surface outside the black box. Depress the four buttons on top of the green juction box and slide the wires in all the way, then release the buttons so that the wires are firmly connected. Once this is done, the circuit board can be screwed back into the black box, extra white audio cable pulled back out, and then the lid can be screwed back on.
Removing or augmenting the high pass filter: The 21c ships with a high pass filter in place that attenuates low frequency sound levels below 1 kHz. This is very useful for substantially reducing noise from wind, surf, auto & plane traffic -- and greatly improves the flight call listening and monitoring experience for most species. To remove this filter so that this low frequency sound is unattenuated, one needs to open the black connector box to access the circuit board. On the circuit board there are six black 2-pin "jumper-shunts" - four are covering 2-pin connectors and two are covering two of the three pins on 3-pin connector interfaces - one pin is exposed. These latter two 3-pin connectors control whether the high pass filter is in or out. The microphone is shipped with the shunts connecting the "hpf" (high pass filter) and "In" pins. To remove the high pass filter simply lift off the shunts and reinsert them over the "In" and "Out" pins. The microphone will not work unless both shunts are connected in a corresponding way.
In some locations (e.g., near ocean surf or automobile highway) more low frequency attenuation may be desired. To implement a 2 kHz high pass filter, which leads to substantially attentuated sound levels below 2 kHz, remove all four 2-pin jumper shunts (store them for when the mic might need to be returned to the 1 kHz high pass circuit).
Testing the microphone: When power is initially connected, the microphone emits five short tones in quick succession. If you are very close to the mic and have good hearing, the tones are audible. You can test this to make sure the microphone is working before you mount it on a rooftop. To reproduce the tones, simply disconnect and reconnect the power supply cable to the black box. Once you have your microphone in position for listening/monitoring, check to make sure your monitoring device can detect the tones when you power up the microphone. The microphone also has two red LEDs inside which light up when the mic is powered. These give the mic a red glow at night so power can be verified from a distance. If the red glow of the mic is a problem, the mic exterior can be painted or mounted in another container that isn't translucent.
The 2024/2025 version of the 21c is smaller and lighter than the 2020 version, but with the same functionality. Please bring any issues to the attention of Bill Evans at:
ear2sky at
oldbird dot
org