Old Bird 21c microphone self-maintenance
(changing a damaged microphone element)
The instructions below include videos that show an old version 21c microphone, which was damaged when the cloth cover and plastic wrap were penetrated by hail. Water then reached the mic element and it soon failed. By the time the mic was removed from the roof-top location, dust and debris had settled into the acryclic pyramid reflector. The videos show how to remove the old mic element and replace it with a new one.
i. obtain new microphone element
ii. remove acrylic pyramid & old microphone element
iii. install new microphone element
iv. reattach 4-pin connector
v. an alternative that doesn't involve soldering
vi. reinstall pyramid with new mic element to circuit board
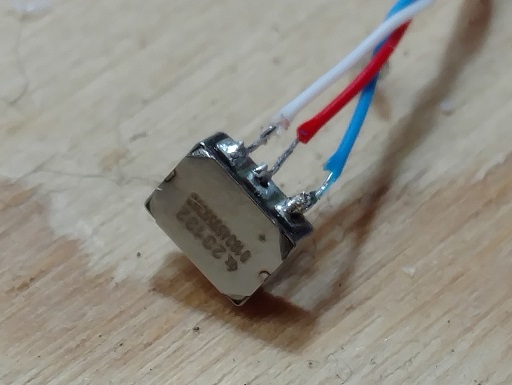
i. The first step is to obtain a new microphone element with leads and female black four-pin connector. The easiest way is to order one through this link on the Old Bird website. If one is proficient in soldering, one can purchase & assemble the microphone element (Knowles EK-23132), wire (30 AWG blue, red, & white, e.g., Jonard Tools), and female four-pin connector (e.g., Digikey part no. 609-2234-ND). The mic element can be purchased singly or in batches from Digikey.com or Mouser.com. The 21c microphone uses blue wire for the + solder post on the mic element, red for the signal (middle post) and white for the return current post (pic). ~7 inch lengths of wire works best. The + soldering post is noted in small print on the face of the mic element. Here is a video of soldering 30 gauge wire to posts of Knowles EK-23132 microphone element. Use the soldering iron to make bare a small portion of both ends of the wire (~ 1/4 cm). Silver the exposed ends with a small amount of solder. Apply a very small bead of solder to the point of the soldering iron and make contact with the end of a 7 inch wire as it lays atop the appropriate solder post on the microphone element.
ii. The next step is to remove the old microphone element. To do so, follow instructions (i-iii) to remove the cloth cover and take the base apart from the bucket. Then remove the plastic cover and tape connecting it to the base, disconnect the black female four-pin connector from the circuit board, and remove the acrylic pyramid from the base.
Desolder, or use sissors, to remove the black four-pin connector from the wires. If the 21c mic is older than 2017, the microphone element is likely glued on. Use a flat head screwdriver or butter knife to dislodge it and pull it with the wires free from pyramid. Then scape away any excess dried glue or debris that has accumulated inside the apex of the pyramid. Use a tooth brush or paper towel to thoroughly clean the interior of the acrylic pyramid's apex. Soap and water can be used but make sure to thoroughly rinse and dry the pyramid before going on to the next step of installing the new microphone element. Btw, there will be remains of the glue in the apex and the pyramid will not look as good as new, but it will work as good as new. See this video for an example of the aforementioned steps.
If the 21c mic is 2017 or newer, the mic element is not glued in the pyramid's apex. The hole for the wires in this newer version is not on the side of the pyramid but adjacent to the apex. The mic element is held securely in place by taping a portion of the wire protruding from the pyramid to the side of the pyramid. By removing this tape, the mic element can simply be pulled free once the four-pin connector is removed.
iii. Now it's time to install the new microphone element. Make sure the microphone element is angle 90 degrees to the wires as shown here. Thread the three wires through the hole in the interior near the apex and pull the slack until the microphone fits snugly into the Apex. Bend the length of the wire over the other side of the apex and apply clear tape (e.g., FrostKing window seal tape) to hold the wire (and the microphone element) in place. These steps are shown in this video. The first scene in that video shows the step of drilling a small hole near the apex for the microphone wires to go through. This pyramid had come from a pre-2017 version of the 21c, which has the hole midway up one of the sides. Later in the video that old hole is pointed out and shown taped over.
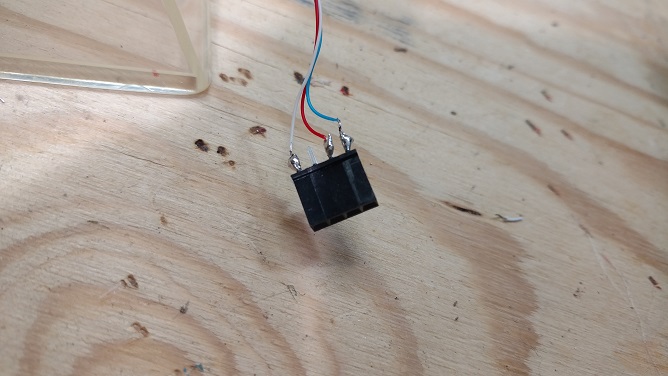
iv. The final step is soldering the black four-pin connector to the wires. On one side or the other connect the the blue (color optional) 30 gauge wire from the positive post of the mic element. On the adjacent pin solder the red signal wire, then skip a pin and on the end pin connect the white return current wire (pic).
v. Another route for replacing the microphone element is to drill a large enough hole near the apex so that the mic element can be inserted. One should then try to position the mic element so the the small holes on the element are facing down and the element is snug within a 1/2 cm of the interior of the apex. This route avoids soldering if the mic element w/leads is ordered through Old Bird. Once positioned. the exterior of the apex can be taped to secure the wires and make a tight seal.
vi. The pyramid with new mic element is ready to be reconnected to the four pins on the circuit board - the two pins together, in this case blue & red are on the top. Make sure the four slots of the female connector fit over all four of the male pins on the circuit board. One can then follow the directions for replacing the covers to complete the job.